


 FREE SHIPPING £75+
 CELEBRATING 50+ YEARS
 PRICE MATCH GUARANTEE
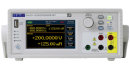
Current and Voltage Accuracy in Two Setting Methods
When setting the output current or voltage from DC power supply, a higher accuracy can be achieved by panel setting or remote PC setting instead of ammeter adjustment. Below explains the accuracy difference between these two methods taking PMX35-1A and PMX18-5A as an example.
CC Accuracy
1. Panel Setting/Remote PC Setting Accuracy
When setting CC with the SET button and knob, CC setting accuracy regards as how an actual CC value differs from a true value.
E.g.) For PMX35-1A and PMX18-5A, the setting accuracy value is: ± (0.3% of setting + 0.1% of rating).
When setting 300mA from the panel, the following error is included: PMX35-1A: ± (0.3 x 0.003 + 1 x 0.001) = ± 0.0019 (A)
PMX18-5A: ± (0.3 x 0.003 + 5 x 0.001) = ± 0.0059 (A)
It means that PMX18-5A may cause a larger error with this setting method. If you need to pass 1A, a higher accuracy can be achieved through PMX35-1A.
The same applies to the remote PC setting.
2. Ammeter Adjustment Accuracy
When setting CC (300mA) by adjusting an ammeter, the ammeter accuracy regards as how an actual CC value differs from a true value.
E.g.) For PMX35-1A and PMX18-5A, the ammeter accuracy value is: ± (1% of reading + 5 digits);
When setting 300mA by adjusting the ammeter, the following error is included: PMX35-1A: ± (0.3 x 0.01+ 0.005) = ± 0.008 (A)
PMX18-5A: ± (0.3 x 0.01+ 0.005) = ± 0.008 (A)
It means that PMX35-1A andPMX18-5A obtain the same error results with ammeter adjustment.
Generally, the higher accuracy can be obtained by setting from panel or PC instead of adjusting
the ammeter.
Therefore, the current accuracy will be determined which method to be used.
Conclusion:
To improve the current accuracy;
1) Choose DC power supply whose rated current is close to your required value.
2) Set current from SET button or PC instead of ammeter adjustment.
CV Accuracy
1. Panel Setting/Remote PC Setting Accuracy
When setting CV with the SET button and knob, CV setting accuracy regards as how an actual CV value differs from a true value.
E.g.) For PMX35-1A and PMX18-5A, the setting accuracy value is: ± (0.2% of setting + 0.1% of rating).
When setting 5V from the panel, the following error is included: PMX35-1A: ± (5 x 0.002 + 35 x 0.001) = ± 0.045 (V)
PMX18-5A: ± (5 x 0.002 + 18 x 0.001) = ± 0.028 (V)
It means that PMX35-1A may cause a larger error with this setting method.
If you need to apply 5V, a higher accuracy can be achieved through PMX18-5A. The same applies to the remote PC setting.
2. Voltmeter Adjustment Accuracy
When setting CV (5V) by adjusting a voltmeter, the voltmeter accuracy regards as how an actual CV value differs from a true value.
E.g.) For PMX35-1A and PMX18-5A, the voltmeter accuracy value is: ± (0.5% of reading + 2 digits);
When setting 5V by adjusting the voltmeter, the following error is included: PMX35-1A: ± (5 x 0.005 + 0.04) = ± 0.065 (V)
PMX18-5A: ± (5 x 0.005 + 0.04) = ± 0.065 (V)
It means that PMX35-1A andPMX18-5A obtain the same error results with voltmeter adjustment.
Generally, the higher accuracy can be obtained by setting from panel or PC instead of adjusting
the voltmeter.
Therefore, the voltage accuracy will be determined which method to be used.
Conclusion:
To improve the voltage accuracy;
1) Choose DC power supply whose rated voltage is close to your required value.
2) Set voltage from SET button or PC instead of voltmeter adjustment.
Please be sure to verify each setting accuracy and meter accuracy before setting the output.
Products Mentioned In This Article:
PMX Series please see HERE