


A resolver is an electromagnetic sensor that is used to determine the mechanical angle and velocity of a shaft or axle. They are often used in automotive applications (cam/crankshaft position), aeronautics (flap position), as well as servos and industrial applications.
When designing, testing, or troubleshooting systems that use resolvers, it can be worthwhile to build a system that can easy simulate the output of a resolver. This is especially helpful when testing the operational limits of the resolver measurement circuitry and any code that may accompany these measurements. Simulation allows you to control and test the limits of operation of a system by adding known errors to the signal or by changing the frequency/amplitude/waveform shapes to see where the system begins to fail.
In this application note, we are going to describe a method of simulating a simple resolver using a SIGLENT SDG2000X Series arbitrary waveform generator.
RESOLVER BASICS
Many resolvers share a similar design as shown in Figure 1: A primary winding or coil that is attached to a shaft or rotor, and two stationary windings, or stators that are positioned at 90 degrees to one another.
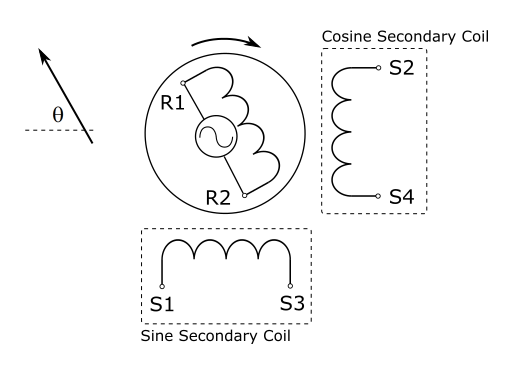
Figure 1: Basic resolver design.
The primary winding is energized with an AC Voltage, Vr. This primary excitation signal is typically a sinewave that is then coupled into both secondary coils. In many resolvers, the secondary coils are built such that coils are physically mounted 90 degrees from one another. Since each coil is physically located in a different location with respect to the primary coil, they will each have different coupling efficiency and, because they are mounted 90 degrees apart, their outputs will be orthogonal (90 degrees out-of-phase of each other). As the shaft angle changes, the output signal for the secondary coils will change as shown in Figure 2.
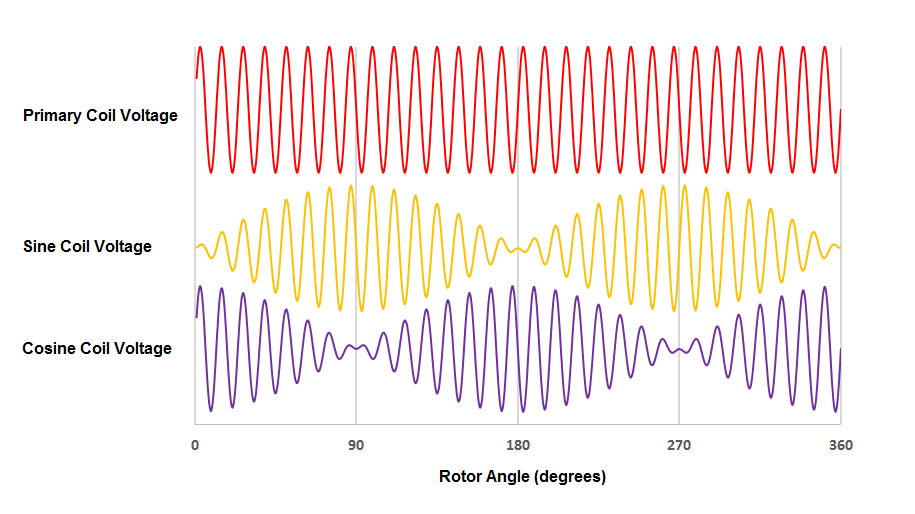
Figure 2: Coil voltage vs Rotor Angle for a sine primary voltage.
Therefore, there are discrete voltage values for each shaft angle. By measuring the instantaneous voltages of the secondary coils, you can determine the rotor angle.
EQUIPMENT
In this simulation, we are going to use a waveform generator to source the primary coil signal. This signal will be used to simultaneously modulate the outputs of a dual channel generator. These outputs will represent the secondary sine and cosine coil output signals, as discussed previously.
- SDG805: Modulation source for secondary coil outputs.This instrument should be able to match the primary coil minimum and maximum frequency specifications of the resolver you are simulating. Many resolvers have primary coil signals that vary from 5 k to 20 kHz and a few hundred mV to 100’s of volts. These higher voltages are used to excite the secondary coils.
- SDG1032X: Secondary coil simulation.This model has a single external modulation input, independent phase control, and Dual Side Band AM (DSB-AM) modulation which we will need to successfully simulate the sine and cosine signals of a resolver.
- Dual Channel Oscilloscope: Signal verification.It is important to select a scope with the proper bandwidth (at least 2 to 3x the max frequency of primary frequency, even higher if the primary has higher harmonics/square wave). In this example, we are going to use a SIGLENT SDS2102X. This platform has deep memory (140M points), zoom, and a large display that will make verification easier.
SETUP
Use a BNC terminated cable to connect CH1 output of the primary generator to the Aux/Mod In of the secondary coil generator, as shown below in Figure 3.
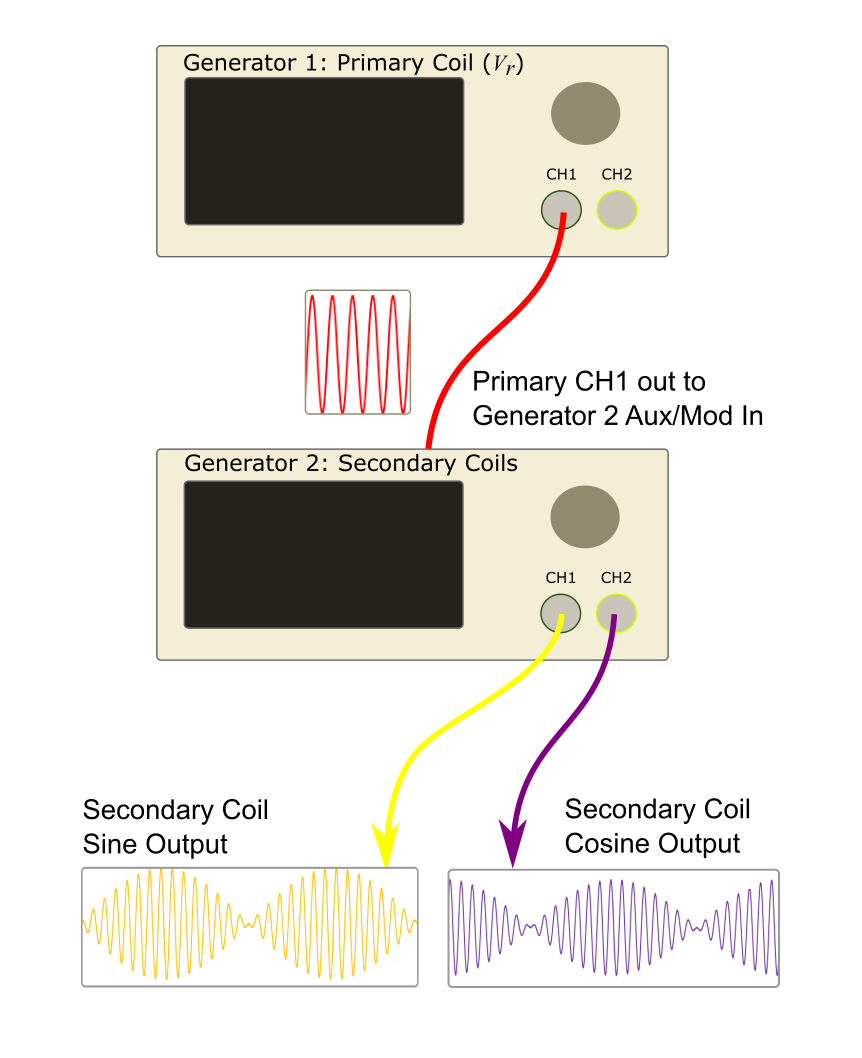
Figure 3: Physical connections between the two generators.
1. Connect the secondary coil outputs of the second generator (CH1 and CH2) to the inputs of the oscilloscope.
2. Configure the primary coil generator to output a sine wave at the lowest frequency of Vr for your system. Typically, the Vr frequency ranges from 5 k to 20 kHz.
The primary coil generator is going to be used to modulate the output signals of the secondary coil generator. The voltage for the primary signal should be low to start (5Vpp). We will optimize it later.
3. Set the secondary coil generator CH1 to output a sine wave with a frequency of 1Hz, voltage of 10Vpp (or equivalent to the maximum voltage of your resolver circuit).
4. Set the secondary coil generator CH1 to perform a Dual-Side-Band AM (DSB AM) modulation by pressing Mod and select the DSB-AM type.
5. Configure CH2 on the secondary coil generator to output the same modulated sine signal as channel 1, only set the phase offset to 90 degrees. This will provide the orthogonal output phase for the secondary cosine channel.
The secondary coil frequency represents the rotational frequency of the rotating primary coil in a physical resolver. Be sure to set both CH1 and CH2 to the same frequency.
NOTE: The SIGLENT SDG1000X and SDS2000X series feature a Channel Copy
And a channel coupling function which makes the process easier.
To couple the frequency selection between two channels, press Utility > CH Copy Coupling > FreqCoupl = ON. Now, any changes in frequency on either channel will be applied to the other channel. This allows you to simultaneously change both frequencies.
To copy settings from one channel to another, press Utility > CH Copy Coupling > CH Copy > CH1 => CH2
6. Enable the primary coil generator CH1 and both outputs of the secondary coil generator.
7. Verify the performance, adjust the secondary coil frequency (rate of change of the rotor), verify, and so on until you have fully tested the limits of the resolver system.
The figures below show images of secondary coil simulations at various primary coil frequencies and secondary coil frequencies:
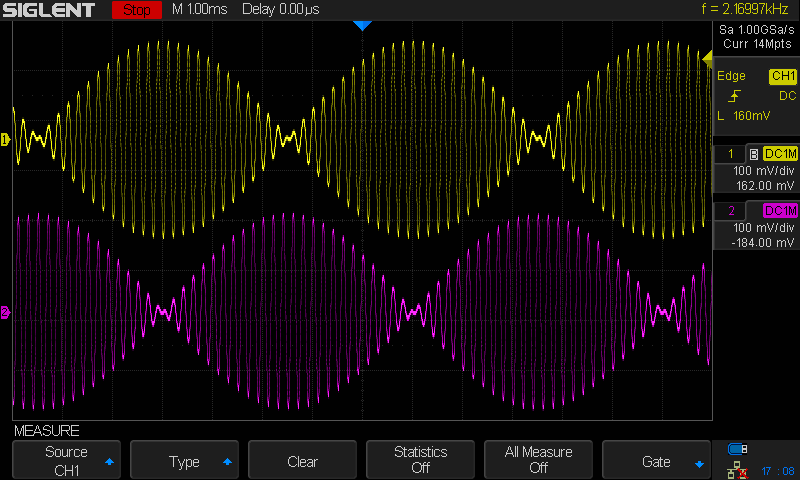
Figure 4: Primary coil 5 kHz, secondary coils at 100 Hz.
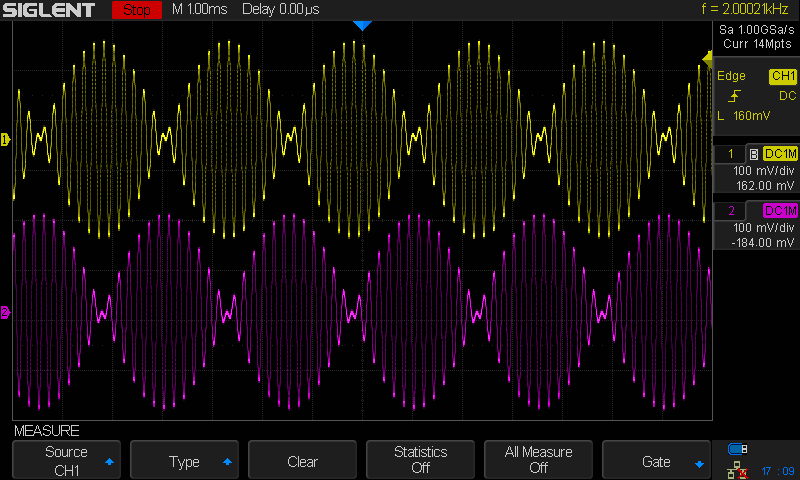
Figure 5: Primary coil 5 kHz, secondary coils at 200 Hz.
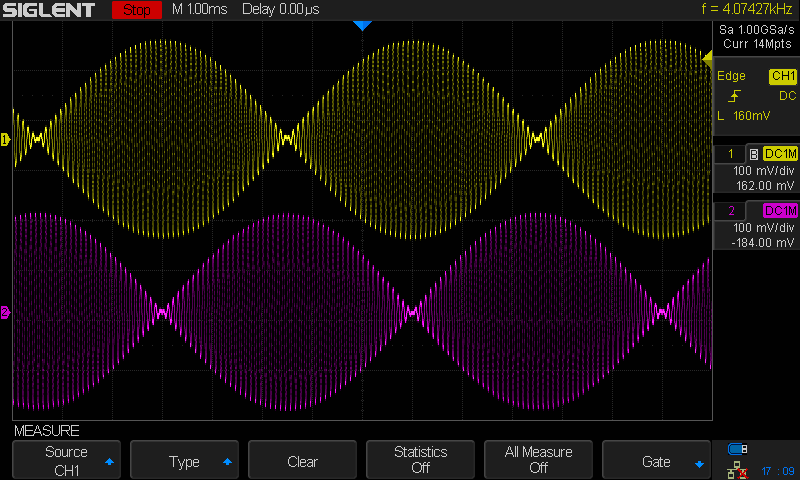
Figure 6: Primary coil 10 kHz, secondary coils at 100 Hz.
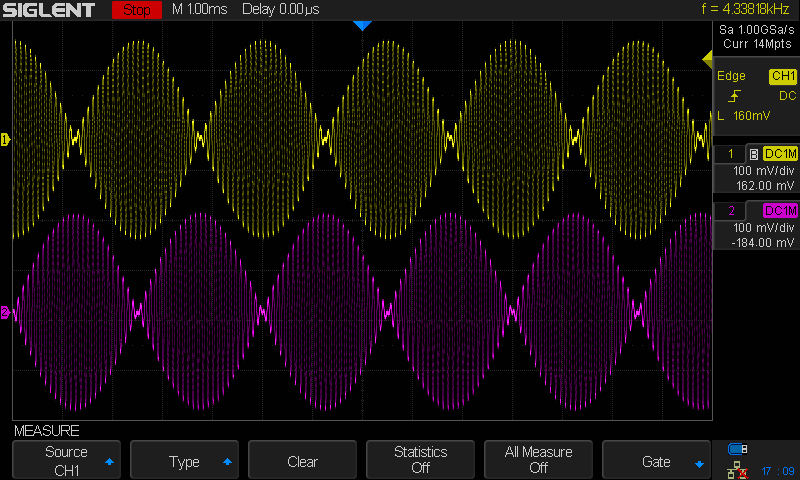
Figure 7: Primary coil 10 kHz, secondary coils at 200 Hz.
TIPS
Do not overdrive the modulation input of the secondary coil generator with too much voltage. Around 10Vpp is enough to get full modulation without overdriving. Figure 8 below shows when too much voltage is applied to the modulation input (12Vpp). Figure 9 shows correct modulation depth (10Vpp).
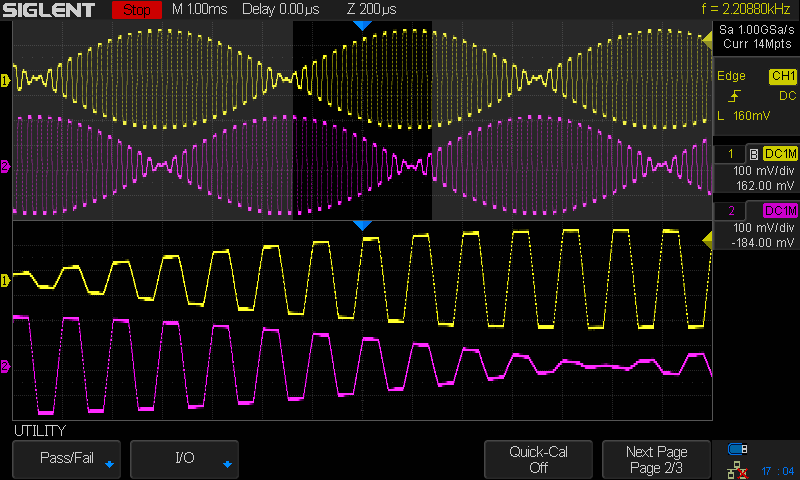
Figure 8: Primary modulation voltage is too high. Note square edges of the waveforms.
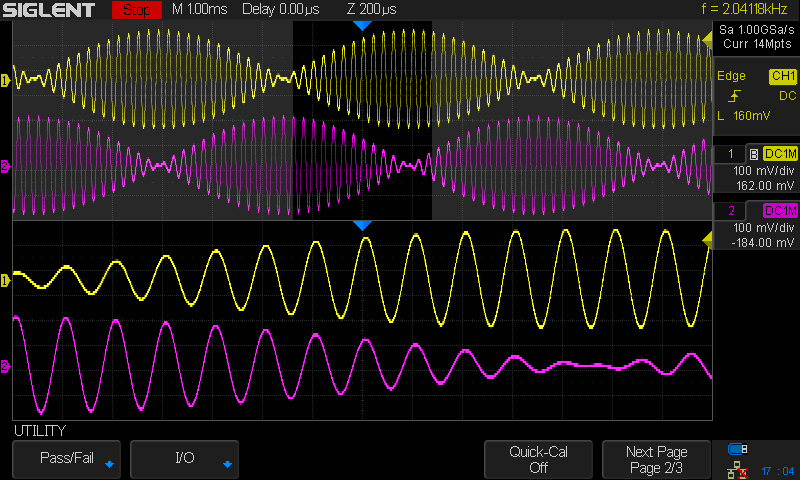
Figure 9: Primary modulation voltage is correct. Note the smooth edges of the waveforms.
Compare the modulation frequency of the primary coil and the modulation specifications of the secondary coil generator. If the modulation input of the secondary generator is low frequency, you may get “steps” in the output, as shown below:

Figure 10: Secondary coil signals with a primary coil frequency set too high.

Figure 11: Zoom of high frequency primary voltage. Note “steps” due to quantization.
If this is the case, you can smooth the “steps” by placing low pass output filters on each of the secondary coil generator outputs.
This is very similar to filtering the images from a digital-to-analog (DAC) converter.
The SDG1000X and SDG2000X have modulation sample clocks that are operating at 600 kHz. By adding a low pass filter with a pass band below the Nyquist limit for 600 kHz,
Design the filter such that the passband is below the 1st image frequency.

CONCLUSION
Simulating resolver outputs using arbitrary waveform generators provides an easy way to verify and troubleshoot the operation of resolver circuitry and software. The SIGLENT SDG1000X and 2000X series provide flexible and fast test instruments for this application.
REFERENCES
Infineon; (2016, December). DSD: Delta Sigma Demodulator [Web Article]. Retrieved from https://infineon.com
Szymczak, J.; et. Al (2014, March). Precision Resolver-to-Digital Converter Measures Angular Position and Velocity [Web Article]. Retrieved from https://analog.com
For more information, check Arbitrary Waveform Generators, or contact your local Siglent office.